Thymeleaf 정리

기존에는 뷰 템플릿으로 JSP를 주로 사용해보았기에 Thymeleaf를 거의 처음 사용하기에 새롭게 겪은 기능들에 대해서 간단하게 정리해보려고 한다.
Layout
thymeleaf에서 layout을 관리하는 방법은 크게 include 방식과 계층형 방식이 있다. 다음은 include 방식의 예시이다.
jsp `include 액션 태그`처럼 thymleaf에서는 `th:replace`를 통해서 HTML fragment를 관리할 수 있다.
<!DOCTYPE HTML>
<html xmlns:th="http://www.thymeleaf.org">
<head th:replace="fragments/header :: header">				--- [1]
    <title>Hello</title>
    <meta http-equiv="Content-Type" content="text/html; charset=UTF-8" />
</head>

<body>

<div class="container">

    <div th:replace="fragments/bodyHeader :: bodyHeader" />				--- [2]

    <div class="content">
    </div>

    <div th:replace="fragments/footer :: footer" />				--- [3]

</div> <!-- /container -->

</body>
</html>
include 방식은 사실 무식한 방법이다. layout을 짜기위해 계속 코드를 작성해주어야 하기 때문이다. 실제 실무라면 계층형 방식이 좋겠지만 간단한 프로젝트에서 계층형 방식을 쓰려면 결국 세팅 과정이 들어가야 하므로 간단하다면 include 방식을 사용해도 좋다.
궁극적으로는 중복되는 코드를 지양하기 위해 계층형 방식을 사용하는 것이 좋다.
https://www.thymeleaf.org/doc/tutorials/3.1/usingthymeleaf.html#template-layout
Tutorial: Using Thymeleaf
1 Introducing Thymeleaf 1.1 What is Thymeleaf? Thymeleaf is a modern server-side Java template engine for both web and standalone environments, capable of processing HTML, XML, JavaScript, CSS and even plain text. The main goal of Thymeleaf is to provide a
www.thymeleaf.org
Form 화면 - Object Binding
thymeleaf에서는 서버에 보내는 form의 데이터들을 묶어 object로 만들 수 있도록 `th:object` 태그와 `*` 문법을 함께 사용하여 처리할 수 있다.
아래 예시에서 [1]번에서는 `th:object` 태그를 통해 object 명을 설정하고 [2]번에서는 아래 오브젝트 아래의 변수명을 설정한다.
[2]에서는 `th:field`를 사용하게 되는데 이는 HTML에서 관례적으로 name과 id값을 같게 입력하는 과정을 한 태그로 대체시켜준다.
즉, th:field="*{city}"는 id="city" name="city" 을 뜻한다.
<div class="container">
    <div th:replace="fragments/bodyHeader :: bodyHeader"/>

    <form role="form" action="/members/new" th:object="${memberForm}" method="post">			---[1]
        <div class="form-group">
            <label th:for="name">이름</label>

            <input type="text" th:field="*{name}" class="form-control" placeholder="이름을 입력하세요"
                   th:class="${#fields.hasErrors('name')}? 'form-control fieldError' : 'form-control'">
            <p th:if="${#fields.hasErrors('name')}" th:errors="*{name}">Incorrect date</p>			---[3]

        </div>
        <div class="form-group">
            <label th:for="city">도시</label>
            <input type="text" th:field="*{city}" class="form-control" placeholder="도시를 입력하세요">			---[2]
        </div>
        <div class="form-group">
            <label th:for="street">거리</label>
            <input type="text" th:field="*{street}" class="form-control" placeholder="거리를 입력하세요">
        </div>
        <div class="form-group">
            <label th:for="zipcode">우편번호</label>
            <input type="text" th:field="*{zipcode}" class="form-control" placeholder="우편번호를 입력하세요">
        </div>
        <button type="submit" class="btn btn-primary">Submit</button>
    </form>
    <br/>
    <div th:replace="fragments/footer :: footer" />
</div>
thymeleaf - expressions-on-selections-asterisk-syntax
Tutorial: Using Thymeleaf
1 Introducing Thymeleaf 1.1 What is Thymeleaf? Thymeleaf is a modern server-side Java template engine for both web and standalone environments, capable of processing HTML, XML, JavaScript, CSS and even plain text. The main goal of Thymeleaf is to provide a
www.thymeleaf.org
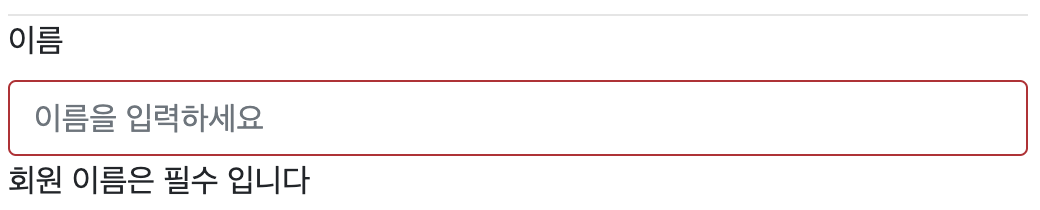
그리고 만약 서버에서 유효성 검사에 실패하게 되면 3번과 같이 `<p th:if="${#fields.hasErrors('name')}" th:errors="*{name}">`를 사용하여 Validation Message에 설정에 놓은 Error 문구를 다음 사진과 표시할 수 있다. 신기하게도 `th:errors="*{name}"`태그는 우리가 Form 클래스의 name field를 의미하며 `@Valid`에 설정해놓은 메세지가 출력된다. 이 부분에서 Spring과 Thymeleaf가 잘 연계되어 있음을 깨달았다.
thymeleaf -7 Validation and Error Messages
Tutorial: Thymeleaf + Spring
Preface This tutorial explains how Thymeleaf can be integrated with the Spring Framework, especially (but not only) Spring MVC. Note that Thymeleaf has integrations for both versions 3.x and 4.x of the Spring Framework, provided by two separate libraries c
www.thymeleaf.org
List 화면 - table Tag
Thymeleaf의 장점 중 하나는 다음의 [1]을 보면 html 태그를 그대로 사용할 수 있다는 것이다.(이 부분이 프레임워크 없이도 html파일을 직접 열어서 확인할 수 있다는 장점으로 이어진다.)
        <table class="table table-striped">
            <thead>
            <tr>
                <th>#</th>
                <th>이름</th>
                <th>도시</th>
                <th>주소</th><th>우편번호</th>
            </tr>
            </thead>
            <tbody>
            <tr th:each="member : ${members}"					---[1]
                <td th:text="${member.id}"></td>
                <td th:text="${member.name}"></td>
                <td th:text="${member.address?.city}"></td>		---[2]
                <td th:text="${member.address?.street}"></td>
                <td th:text="${member.address?.zipcode}"></td>
            </tr>
            </tbody>
        </table>
또한, [2]부분의 `address?.city`를 보면 jsp에서는 if 태그를 활용하여 분기처리를 해야하지만 Thymeleaf에서는 `?`하나만으로 값이 존재할 때와 존재하지 않을 때의 분기처리를 간편하게 할 수 있었다.
Select Box
	<div class="form-group">
            <label for="member">주문회원</label>
            <select name="memberId" id="member" class="form-control">
                <option value="">회원선택</option>
                <option th:each="member : ${members}"
                        th:value="${member.id}"
                        th:text="${member.name}" />
            </select>
        </div>
each 태그를 이용하여 리스트로 날라오는 member 객체를 받아 option태그로 작성되게끔 반복해준다.
'Web Dev > View' 카테고리의 다른 글
| [View] React 공부해보기 (0) | 2023.04.14 |
|---|